教程:在 AWS Trainium 上使用 torchtitan 训练 Qwen3
Train Qwen3 on AWS Trainium with torchtitan
AWS Machine Learning Blog 介绍如何在单台 trn2.48xlarge 上使用 torchtitan 训练 Qwen3,提供 Transformers v5、torchtitan 原生 Qwen3 和 NKI MoE 内核三种配置。文章还演示通过 override registry 接入自定义 NKI 内核,并说明检查训练损失、内核输出和序列长度约束的方法。
文章把 Transformers v5、torchtitan 原生实现和 NKI MoE 内核三种训练路径放在同一套启动配置下说明,并给出自定义内核接入与校验方法。
通过 AWS Trainium 使用 torchtitan,方式与你一直以来使用它的方式相同。TorchNeuron 将 Trainium 注册为原生 PyTorch 设备,因此 torchtitan 可以通过标准 PyTorch 接口使用它。你可以使用这些配置,从随机初始化开始预训练,也可以微调已发布的权重。你还可以针对自己的工作负载自定义模型实现和内核。在本文中,你将在单个 trn2.48xlarge 上以三种方式训练 Qwen3。
第一种方法是在 torchtitan 中使用 Transformers v5 作为建模后端。它通过 AutoModelForCausalLM 运行 Hub 模型,并直接读写已发布的 safetensors。第二种方法通过更改 config.model_spec,切换到 torchtitan 原生的 Qwen3。第三种方法从 torchtitan-neuron 配方中添加 Neuron Kernel Interface (NKI) 混合专家 (MoE) 内核,然后使用 torchtitan 的覆盖注册表挂接你自己的内核。这三种配置使用相同的 torchrun 启动模式和配置结构。
先决条件
按照本指南操作时,请使用单个 trn2.48xlarge,并选择 AWS Deep Learning AMI for Neuron 或 Neuron PyTorch 训练容器。两种环境都提供在 Trainium 上训练所需的 Neuron 驱动程序、运行时和编译器。
安装 torchtitan-neuron 之前,请检查你的环境是否已包含它。以下命令会显示已安装的版本和软件包路径:
python3 -c "import torchtitan, torchtitan_neuron; print(torchtitan.__version__, torchtitan_neuron.__file__)"本指南使用下表所列的版本。若要复现示例,请固定这些版本。Transformers v5 集成和 Trainium 专用覆盖模块可能会随 torchtitan 的版本而变化。
| 组件 | 版本 |
| 实例 | trn2.48xlarge,16 个 Trainium2 加速器,128 个物理 NeuronCore |
| 逻辑 NeuronCore | LNC=2 时为 64 |
| torch, torch_neuronx | 2.14.0, 2.14.3 |
| transformers | 5.16.0 |
| torchtitan-neuron | release-2.33 (0.2.2+neuron.1) |
安装 torch_neuronx 后,TorchNeuron 会将 Trainium 注册为 neuron 设备,torchtitan 会在启动时检测到它。在 eager 模式下,Neuron 会在操作执行时编译操作。使用 torch.compile 时,Neuron 会编译捕获的图。三种配置都可以使用这一相同的启动模式。
对于本指南使用的版本,请使用 --no-deps 安装 torchtitan-neuron 及 torchtitan 的其余依赖项,以保留 Neuron 版本的 torch:
git clone https://github.com/aws-neuron/torchtitan-neuron
cd torchtitan-neuron
pip install -r requirements.txt
开始训练前,请从 Hugging Face Hub 获取 Qwen3 模型工件。将它们存储在本地目录中,以便在训练配置中指定该目录:
hf download Qwen/Qwen3-4B-Instruct-2507 \
  --local-dir "$PWD/assets/hf/Qwen3-4B-Instruct-2507"
每种训练配置都是一个 Python 配置函数。三个示例都从一个基础配置开始,并在每个步骤中对其进行更新。
使用 Hugging Face Transformers v5 训练
在第一种配置中,Transformers v5 通过 AutoModelForCausalLM 构建 Qwen3。Hub 模型定义提供前向和反向传播所用的实现。你可以在配置中设置模型的 Hub ID 来选择模型。
从 transformers_modeling_backend_full() 开始。它会将映射到 Hugging Face 配置键的字段留空,因此 AutoConfig.from_pretrained() 会从 Hub 加载模型架构。
在运行训练命令的 torchtitan-neuron 仓库根目录中创建 neuron_qwen3.py。添加导入语句、模型工件路径和基础配置:
import os
from torchtitan.experiments.transformers_modeling_backend.config_registry import (
    transformers_modeling_backend_full,
)
from torchtitan.experiments.transformers_modeling_backend.configs import (
    TransformersBackendConfig,
)

ASSETS = os.path.abspath("./assets/hf/Qwen3-4B-Instruct-2507")

def v5_qwen3_4b() -> TransformersBackendConfig:
    config = transformers_modeling_backend_full()
    config.hf_model = "Qwen/Qwen3-4B-Instruct-2507"
    config.hf_assets_path = ASSETS
    config.dataloader.dataset = "c4_test"
    config.training.steps = 10
    config.training.local_batch_size = 1
    config.parallelism.data_parallel_shard_degree = -1
    return config
torchrun --nproc_per_node=64 --rdzv_backend c10d --rdzv_endpoint localhost:0 \
--local-ranks-filter 0 --role rank --tee 3 \
-m torchtitan.train --module neuron_qwen3 --config v5_qwen3_4b此命令会启动 64 个训练进程,每个逻辑 NeuronCore 对应一个进程。--module neuron_qwen3 会导入本地配置模块。--config v5_qwen3_4b 用于选择配置函数。数据并行设置会将模型分片到全部 64 个 rank 上。
加载和保存 Hugging Face 检查点
要从已发布的权重进行微调,请启用检查点加载,并将 initial_load_path 指向 ASSETS。状态字典适配器会调整前导 model. 前缀并处理绑定的嵌入层。它会将最终检查点保存为 Hugging Face safetensors。
def v5_qwen3_4b_finetune() -> TransformersBackendConfig:
    config = v5_qwen3_4b()
    config.checkpoint.enable = True
    config.checkpoint.folder = "checkpoint_qwen3_4b_ft"
    config.checkpoint.initial_load_path = ASSETS # absolute path required
    config.checkpoint.initial_load_in_hf = True
    config.checkpoint.initial_load_model_only = True
    config.checkpoint.last_save_in_hf = True
    config.checkpoint.last_save_model_only = True
    return config
使用第一个训练步骤的损失快速检查 torchtitan 是否加载了已发布的权重。对于 Qwen/Qwen3-4B-Instruct-2507,经验证的运行从已发布权重开始时,步骤 1 的损失为 6.54;从随机初始化开始时则为 12.43。
训练后,使用 AutoModelForCausalLM 和 load_state_dict 加载导出的检查点。成功往返加载后,除了 lm_head.weight 之外,不会报告缺失或意外的键;Qwen3-4B 会将其与 token embeddings 绑定。这确认这些文件仍是标准的 Hugging Face 检查点。
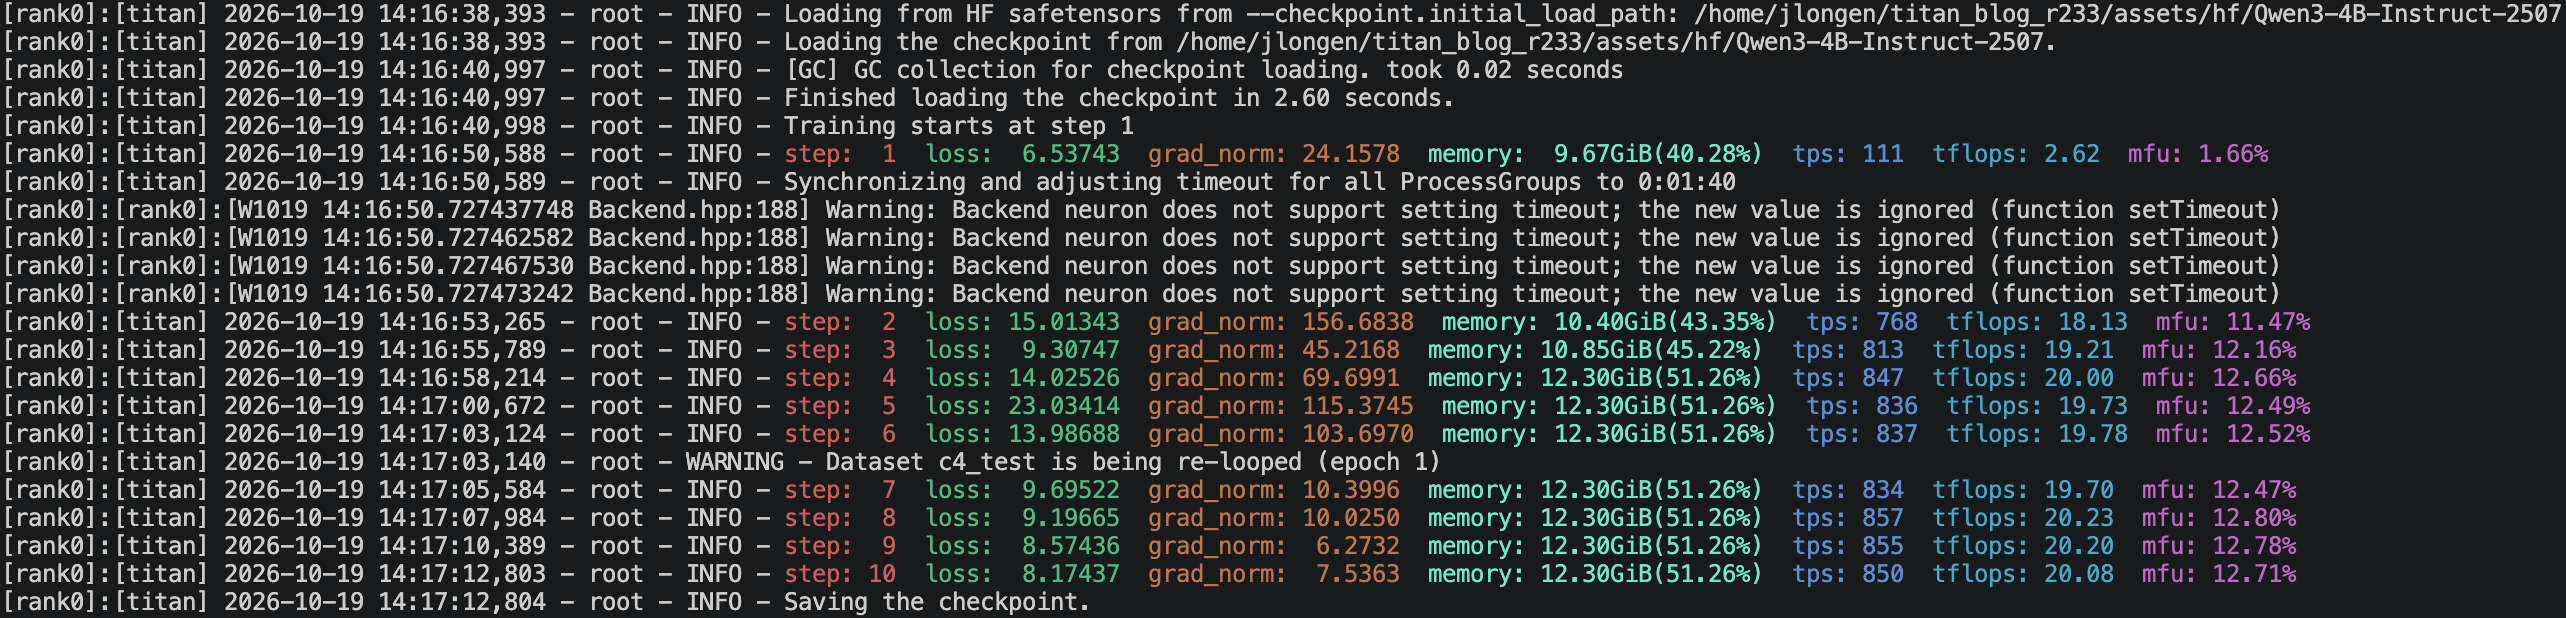
图 1:已发布的检查点初始损失为 6.54,导出的权重加载时没有缺失或意外的键
使用 torchtitan 的原生模型训练
在第二种配置中,torchtitan 会构建其原生 Qwen3Model。将原生 Qwen3 导入项和配置函数添加到 neuron_qwen3.py:
此示例从 qwen3_32b() 开始,因为经过测试的 torchtitan 版本不提供通用的 qwen3_4b() 配置构建器。下一行将 32B 模型规格替换为 4B 模型规格。其余字段复现了经过测试的运行。
from torchtitan.models.qwen3 import model_registry
from torchtitan.models.qwen3.config_registry import qwen3_32b
from torchtitan.trainer import Trainer

def native_qwen3_4b() -> Trainer.Config:
    config = qwen3_32b()
    config.model_spec = model_registry("4B", attn_backend="sdpa")
    config.hf_assets_path = ASSETS
    config.dataloader.dataset = "c4_test"
    config.training.steps = 10
    config.training.local_batch_size = 1
    config.training.global_batch_size = 64
    config.parallelism.data_parallel_shard_degree = -1
    return config
torchrun --nproc_per_node=64 --rdzv_backend c10d --rdzv_endpoint localhost:0 \
--local-ranks-filter 0 --role rank --tee 3 \
-m torchtitan.train --module neuron_qwen3 --config native_qwen3_4bconfig.model_spec 选择模型类,并定义 torchtitan 如何对模型进行分片以及如何映射其检查点键。在此处,model_registry("4B", attn_backend="sdpa") 选择 torchtitan 的原生 Qwen3 实现,并使用缩放点积注意力(SDPA)。
为混合专家模型添加 NKI 内核
在第三种配置中,torchtitan 使用以 NKI(Neuron 内核语言)编写的内核运行混合专家层。将所需的导入项和 Qwen3 MoE 配置函数添加到 neuron_qwen3.py:
from torchtitan.config import CompileConfig
from torchtitan_neuron.models.qwen3.config_registry import qwen3_nki_moe_config
def nki_qwen3_30b_a3b() -> Trainer.Config:
config = qwen3_nki_moe_config(
"30B-A3B",
compile_config=CompileConfig(enable=False, backend="neuron"),
n_layers=4,
num_experts=64,
top_k=4,
)
config.hf_assets_path = ASSETS
return configtorchrun --nproc_per_node=64 --rdzv_backend c10d --rdzv_endpoint localhost:0 \
--local-ranks-filter 0 --role rank --tee 3 \
-m torchtitan.train --module neuron_qwen3 --config nki_qwen3_30b_a3b此配置将数据并行分片分布在 64 个 rank 上,张量并行度为 1。它不使用专家并行。num_experts=64 设置模型中的专家数量,而非专家并行度。
设置 CompileConfig(enable=False) 后,此示例将以急切模式运行。TorchNeuron 在急切执行和 torch.compile 中都支持已注册的 NKI 运算符。
在本演示所用的 torchtitan 版本中,qwen3_nki_moe_config() 会将 MoE 模块替换为 NKI 分组专家实现。它还会选择 SDPA 和免 gather 的旋转位置嵌入。启用 torch.compile 时,将 "grad_clip" 添加到 CompileConfig.components,以编译梯度范数裁剪。
NKI 内核以 PyTorch 运算符的形式参与训练。wrap_nki 使 NKI 内核可从 PyTorch 调用,nki_op 则注册该运算符。register_autograd 使用前向传播期间保存的路由元数据,为其附加反向传播过程。
此示例将 Qwen3-30B-A3B 缩减为 4 层和 64 个专家,使其能够装入一块 trn2.48xlarge。它使用 top_k=4 将每个 token 路由到 4 个专家。
接入你自己的 NKI 内核
有时,你可能希望针对模型中的张量形状优化某个运算。专用内核可以针对这些形状定制分块和数据移动方式。它还可以用一个优化后的运算符替代一系列性能关键的 PyTorch 运算。你可以自行编写内核,也可以从 nkilib 中选用一个。本示例使用 nkilib.core.embeddings 中的 rope_hf;它要求使用 Hugging Face 张量布局,并支持自身的反向模式。本示例展示的是内核注册和自动微分集成,而非性能提升。
在仓库根目录(即启动训练的位置)创建 my_neuron_kernels.py。torchtitan 将 query 和 key 存储为 [batch, seq, heads, head_dim],而 rope_hf 需要 [batch, heads, seq, head_dim]。在运算符内部转换布局,并使用 torch.empty_like() 分配输出张量:
import torch
from nkilib.core.embeddings.rope_hf import rope_hf
from torch_neuronx import nki_op
from torch_neuronx.nki_hop import wrap_nki
from torch_neuronx.utils import get_logical_neuron_cores
LNC = (int(get_logical_neuron_cores()),)
wrapped_rope = wrap_nki(rope_hf)
@nki_op("my_kernels::rope_fwd")
def rope_fwd(query, key, rope_cache):
q = query.permute(0, 2, 1, 3).contiguous()
k = key.permute(0, 2, 1, 3).contiguous()
cache = rope_cache.reshape(-1, rope_cache.shape[-1])
q_out, k_out = wrapped_rope[LNC](
q,
k,
torch.empty_like(q),
torch.empty_like(k),
rope_cache=cache,
)
return (
q_out.permute(0, 2, 1, 3).contiguous(),
k_out.permute(0, 2, 1, 3).contiguous(),
)rope_hf 在你使用 backward=True 调用它时计算梯度。为该模式注册第二个算子。在前向传播期间保存旋转缓存,以便反向传播时重用。由于缓存不可微分,缓存梯度返回 None。
@nki_op("my_kernels::rope_bwd")
def rope_bwd(grad_query, grad_key, rope_cache):
gq = grad_query.permute(0, 2, 1, 3).contiguous()
gk = grad_key.permute(0, 2, 1, 3).contiguous()
cache = rope_cache.reshape(-1, rope_cache.shape[-1])
out_q, out_k = wrapped_rope[LNC](
gq,
gk,
torch.empty_like(gq),
torch.empty_like(gk),
rope_cache=cache,
backward=True,
)
return (
out_q.permute(0, 2, 1, 3).contiguous(),
out_k.permute(0, 2, 1, 3).contiguous(),
)def _setup_context(ctx, inputs, output):
ctx.save_for_backward(inputs[2])
def _backward(ctx, grad_query, grad_key):
(rope_cache,) = ctx.saved_tensors
grad_q, grad_k = rope_bwd(grad_query, grad_key, rope_cache)
return grad_q, grad_k, None
rope_fwd.register_autograd(_backward, setup_context=_setup_context)由于 rope_hf 要求序列长度必须受支持,因此在调用内核前验证这一约束。继承 CosSinRoPE,并从 apply_rotary_emb 调用 rope_fwd:
from dataclasses import dataclass
from torchtitan.config import derive, override
from torchtitan.models.common.rope import CosSinRoPE
class NKIRoPE(CosSinRoPE):
@dataclass(kw_only=True, slots=True)
class Config(CosSinRoPE.Config):
pass
@staticmethod
def apply_rotary_emb(query, key, rope_cache):
stride = 128 * LNC[0]
if query.shape[1] % stride:
raise ValueError(
f"rope_hf requires a sequence length that is a multiple of "
f"128 * LNC={stride}, got {query.shape[1]}"
)
q_out, k_out = rope_fwd(query, key, rope_cache)
return q_out.type_as(query), k_out.type_as(key)将 NKIRoPE 注册为 CosSinRoPE 的替代项。derive() 会将共享配置字段复制到替代配置中:
@override(
"nki_rope",
target=CosSinRoPE.Config,
exact=True,
description="nkilib rope_hf kernel in place of the PyTorch rotation",
)
def _nki_rope(cfg: CosSinRoPE.Config) -> NKIRoPE.Config:
return derive(cfg, NKIRoPE.Config)要加载自定义覆盖项,请将其模块名称传递给 --override.imports。torchtitan 会在构建模型前导入注册表条目:
torchrun --nproc_per_node=64 --rdzv_backend c10d --rdzv_endpoint localhost:0 \
  --local-ranks-filter 0 --role rank --tee 3 \
-m torchtitan.train --module neuron_qwen3 --config native_qwen3_4b \
--override.imports my_neuron_kernels开始训练前,torchtitan 会记录覆盖项替换的每个配置节点。确认输出中每个 Qwen3 层都有一个 nki_rope 条目:
[Override] nki_rope: model_spec.model.layers.0.attention.rope CosSinRoPEConfig -> NKIRoPE.Config
[Override] nki_rope: model_spec.model.layers.1.attention.rope CosSinRoPEConfig -> NKIRoPE.Config
将序列长度设为 128 * LNC 的倍数;当 LNC 为 2 时,该值为 256。将旋转缓存重塑为 [seq, head_dim * 2],其中前半部分是余弦值,后半部分是正弦值。内核会在训练开始前验证这些约束。
完整的 torchtitan 示例请参阅 torchtitan_neuron/models/gpt_oss/nki_attention.py。它通过相同的算子和覆盖机制接入 nkilib flash-attention 内核。它还会处理用于张量并行的 DTensor 输入。
使用自定义内核训练前,请将其输出与被替代的实现进行比较。在使用 float32 输入的数值测试中,rope_hf 和 torchtitan 的 PyTorch 旋转嵌入在查询和键上的最大绝对差均为 0.0。
注册多个覆盖项时,使用 fqns 将每个覆盖项限制在预期的模块实例上。例如,fqns=["layers.1[0-9].attention.rope"] 会针对第 10 至第 19 层中的旋转嵌入。如果两个覆盖项指向同一节点,torchtitan 会停止运行;如果某个覆盖项未匹配到任何节点,则会发出警告。
检查训练输出
启动时,确认 torchtitan 报告了 64 个 rank 和预期的模型。首个步骤包括编译,因此耗时会比后续步骤更长。每个训练步骤都会报告损失、梯度范数、高带宽内存(HBM)用量、吞吐量和模型 FLOPs 利用率(MFU)。对于检查点运行,确认首步损失接近 6.54。对于自定义内核运行,确认每个 Qwen3 层都出现一次 nki_rope 覆盖项。
在实例上扩展
Transformers 和原生模型配置使用相同的并行设置。一个 trn2.48xlarge 在 LNC=2 时提供 64 个逻辑 NeuronCore。将 data_parallel_shard_degree = -1 设置为在 torchrun 启动的所有 rank 之间分片模型参数、梯度和优化器状态。
将 config.parallelism.tensor_parallel_degree 设置为在一组 rank 之间分片每一层的权重。每个 rank 都会计算每次矩阵乘法的一部分。默认启用序列并行时,归一化层会处理沿序列维度分片的激活值。torchtitan 会在多维 DeviceMesh 上将张量并行与完全分片数据并行(FSDP)结合使用。
增大模型大小、序列长度或本地批次大小时,留意每个 rank 的 HBM 用量。这些值决定了每个 rank 所需的内存量。
清理
如果要保留检查点,请在清理前将其复制到持久存储中。如果打算重用实例,请停止实例。不再需要该实例时,请终止实例。
结论
AWS Trainium 在本指南的所有三种配置中均可作为受支持的 torchtitan 设备使用。你可以通过 Hugging Face Transformers v5 训练 Qwen3,并直接加载或保存已发布的 safetensors。你还可以通过设置 config.model_spec,使用 torchtitan 原生的 Qwen3 实现进行训练。对于混合专家模型,请使用 torchtitan-neuron NKI 配方。对于自定义内核,请使用覆盖注册表,通过相同的启动流程接入 NKI 运算符。
有关设置指南,请参阅 AWS Neuron 文档。有关当前源码和训练配方,请参阅 torchtitan 代码库。
作者简介

Josh Longenecker
Josh 是 AWS Annapurna Labs ML 加速器团队的解决方案架构师。他帮助客户在 AWS Trainium 上设计、优化和部署分布式 AI 训练与推理工作负载。他的技术兴趣包括分布式 PyTorch、大语言模型训练与推理,以及 NKI 内核。

Alex Hoffman
Alex 是 AWS Annapurna Labs 的软件工程师,负责分布式训练。他通过 torchtitan-neuron,为 AWS Trainium 客户在 TorchNeuron 上提供端到端训练体验。
来源:AWS Machine Learning Blog · aws.amazon.com